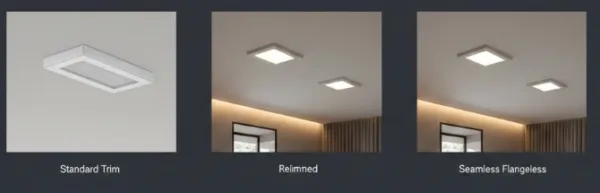
Understanding the Real Taxonomy of “Trimless”
When we talk about trimless recessed lighting or flangeless downlight integration, it’s important to clarify what “trimless” really means in architectural lighting today. While the term is used broadly, the specific category you choose dictates both the final aesthetic and the installation’s complexity.
Commercial “Trimless” with Visible Edge Reveal
Many commercial projects label fixtures as “trimless” when, in reality, they still feature a visible edge reveal—a narrow gap or shadow line around the fixture that breaks the seamless ceiling plane. These are common in retrofits or budget-sensitive builds. While easier to install, the edge reveal interrupts the seamless ceiling lighting effect and can create hotspots or shadows if not carefully detailed.
Magnetic Clip-On Bezel Systems (Pseudo-Trimless)
Next, we have magnetic bezel systems. These use magnetic trimless lighting attachments that clip onto a flange or trim ring hidden beneath the finished ceiling. The result is a “pseudo-trimless” appearance—clean from a distance but technically still relying on a physical bezel for mounting and finishing. This approach simplifies installation and servicing but doesn’t achieve the pure flush look of true flangeless fixtures.
True Flangeless – Four Implementation Families
True flangeless or zero-trim recessed luminaires require the light fixture to integrate directly and flush with the drywall or plaster surface, eliminating any visible trim or flange. In 2026, there are four main technical approaches:
| Implementation Family | Visual Comfort | Finish Risk | Coordination Difficulty | Cost Index |
|---|---|---|---|---|
| Plaster-in / Skim Coat Systems | Excellent (seamless) | Medium-high (skilled finish needed) | High | Medium – High |
| Precision Drywall Cut + Aluminum Framing | Very good | Medium | Medium | Medium |
| Shadow-gap / Integrated Light Channels | Good (with reveal effect) | Low – designed reveal | Medium | Medium |
| Hybrid Magnetic + Skim-coat Ultra-thin Bezel | Good | Medium-low | Low | Low – Medium |
Each family reflects trade-offs between the aesthetic goal of flawless integration, the finishers’ ability to deliver, coordination challenges with ceiling construction, and project budget realities.
Understanding these categories helps architects and lighting pros specify systems that match project demands, balancing drywall integrated linear light goals with practical installation realities. Defining these categories early prevents costly mistakes and ensures your project achieves a flawless flangeless downlight integration
The Four Main Technical Philosophies in 2026
Flangeless architectural integration has evolved into four main technical approaches in 2026, each tailored to different project needs and finish expectations:
1. Plaster-in / Skim-Coat Systems (Wet Finish)
This method involves embedding the fixture into wet plaster or skim-coat layers for a perfectly flush, seamless look. It demands high craftsmanship but results in zero visible edges, ideal for high-end residential or gallery spaces. The downside is longer install times and risk of finish cracks without proper technique.
2. Precision Drywall Cut + Proprietary Aluminum Framing System
Here, a clean drywall cut is combined with a custom aluminum frame that holds the fixture tight to the ceiling plane. This balances durability with a crisp detail line, minimizing finish risk while speeding up installation. It’s a favorite for commercial office spaces where reliability meets aesthetic.
3. Shadow-Gap / Reveals with Integrated Light Channel
This setup uses a narrow reveal or shadow gap between the fixture and ceiling, often with an integrated light channel for architectural slot recessed lighting effects. It creates subtle depth and texture on ceilings but requires careful coordination to avoid dark edges or hotspots.
4. Hybrid Magnetic + Skim-Coat Ultra-Thin Bezel Systems
This newer approach combines magnetic clip-on bezels with a skim coat finish, offering easy serviceability with almost true flangeless aesthetics. The bezel is ultra-thin, helping prevent cracks and paint delamination. It’s rapidly gaining traction, and prillumen light currently prefers this system for its balance of finish quality and install flexibility. You can explore their advanced wet location lighting fixtures which utilize these principles with proven success.
| System Type | Visual Comfort | Finish Risk | Coordination Difficulty | Cost Index |
|---|---|---|---|---|
| Plaster-in / Skim-Coat | Highest | High | High | High |
| Precision Drywall + Aluminum Frame | High | Medium | Medium | Medium |
| Shadow-Gap / Reveal | Medium | Medium-High | High | Medium-High |
| Hybrid Magnetic + Skim-Coat Bezels | High | Low | Low-Medium | Medium-Low |
 Each philosophy tackles flangeless downlight integration differently. Your choice should balance project type, timeline, and maintenance needs. For example, hybrid magnetic systems promise easy retrofits and reduce paint failure, making them ideal for evolving commercial interiors or boutique hotels.
To see how these systems fit into real architectural lighting, consider architectural grade fixtures range of rectangular modular linear lights which follow similar integration principles for seamless ceiling lighting impact.
Anatomy of a Successful Flangeless Detail
Getting a flangeless downlight integration right means thinking through every step like a decision tree. First, identify your ceiling type: standard drywall grid, plaster-in system, or composite assembly. This dictates your mounting hardware and final flush alignment.. This choice impacts mounting options and how clean the final flush-to-ceiling luminaire line will be.
Next, consider plasterboard thickness and edge treatment requirements. Thicker drywall may call for different trimming or skim-coat methods to achieve seamless integration without overbuilding. Edge treatments need to be precise to avoid visible seams or cracking where the fixture meets the ceiling.
Your depth budget is critical too. Balance between structural depth (available space above the ceiling) and coordination challenges, like running HVAC or electrical. Some flangeless systems need minimal clearance, while others require extra space for drivers or heat dissipation, so evaluate early.
Precision is non-negotiable. These three tolerances define a professional install:
- Depth tolerance: Light engine placement must be within a few millimeters (+/- 1-2 mm) of the final surface to avoid hotspots or shadows.
- Planarity: The fixture’s surface and adjacent ceiling plane need to be flat, or you risk shadow lines or unwanted halos.
- Cut accuracy: Precise drywall cuts ensure edges align perfectly with the flangeless bezel, avoiding gaps or uneven reveals.
Lastly, position the light engine carefully relative to the finished surface. Even a slight misalignment changes the perceived flush effect and can cause hotspots or scalloping around the fixture edge.
By following this decision matrix, you’ll achieve a clean, professional flangeless recessed lighting install that fits perfectly into your seamless ceiling lighting design. For detailed examples, check out precision drywall cut systems and their integration process in the prillumen light blog.
Most Common Failure Modes & Their Root Causes
Architects aiming for seamless flangeless downlight integration often face recurring issues that can compromise the clean, trimless look. Here are the most common failure modes and what causes them:
-
Hairline Cracking at Fixture–Drywall Junction
This usually happens due to movement between different materials or improper joint reinforcement. Drywall shrinkage or inconsistent plaster application around the trimless recessed lighting can cause tiny cracks that ruin the smooth finish.
-
Visible Halo, Scalloping, or Hotspot at Edge
Poor light engine positioning or inadequate anti-hotspot downlight design can create uneven glow or bright circles around the fixture edge. This spoils the seamless ceiling lighting effect that designers aim for.
-
Shadow Line or Dark Edge Reveal
Instead of true flangeless integration, subtle shadow lines appear when the ceiling plane and fixture edges don’t align perfectly. This is common with magnetic clip-on bezel systems or sloppy drywall cuts.
-
Uneven Plaster Thickness Causing Visual Banding
When plaster thickness isn’t controlled precisely in plaster-in downlight systems, light interacts unevenly with surfaces, creating distracting bands or streaks.
-
Paint Delamination at Fixture Perimeter
Fluctuations in humidity or poor surface preparation around the drywall integrated linear light can lead to paint peeling off near the fixture edges, revealing imperfect seams.
-
Thermal Movement Cracking Patterns
Expanding and contracting materials, especially around high-output LED fixtures, often develop long, branching cracks unless proper thermal bridging control is applied.
Avoiding these issues starts with understanding each failure mode’s root cause so you can specify proper installation, reinforce joints correctly, and select advanced flangeless systems designed to minimize risk. For deeper insight into flawless installation techniques and avoiding hotspots, our guide on precision drywall integration is a valuable resource.
Addressing these common issues upfront helps guarantee the smooth, trimless recessed lighting look that architects and clients in the US market expect from premium architectural slot recessed lighting solutions.
Engineering & Detailing Best Practices 2026
When it comes to flangeless downlight integration, smart engineering and detailing are key to long-lasting, flawless results. Here’s what you need to focus on in 2026:
-
Control of Thermal Bridging & Material Movement
Minimizing thermal bridging helps prevent condensation and cracking around the fixture. Using materials with compatible expansion rates and adequate spacing reduces stress from temperature changes, ensuring the drywall integrated linear light stays tight and clean.
-
Acceptable Joint Reinforcement Strategies
Reinforcement at the edges where the fixture meets the ceiling is critical. Use fiberglass mesh or flexible joint compounds designed for modern plaster-in downlight systems to avoid hairline cracking and paint delamination.
-
Remote Driver Placement – Best Practice Zoning & Access
Prioritize driver accessibility. Place them in ventilated enclosures or behind hidden access panels for easy maintenance, ideally separate from the fixture housing. This simplifies maintenance without compromising the zero-trim recessed luminaire’s seamless appearance and supports better heat management.
-
Dimming Protocol Compatibility & Flicker Performance
Ensure your lighting system works with the latest dimming controls while eliminating flicker. Compatibility with universal dimmers and driver firmware updates is essential, particularly for magnetic trimless lighting where flicker can be more noticeable.
-
Acoustic Ceiling Considerations (Perforated + Flangeless)
For acoustic ceilings, precision is key to maintaining both sound absorption and visual continuity to preserve sound absorption without visible flaws. Use precision cut drywall and framing systems that align perfectly, maintaining both the acoustic and visual quality.
For a comprehensive solution that balances all these factors, consider innovative systems like prillumen light’s offerings, which emphasize precision and reliability for architectural slot recessed lighting. Their portfolio of advanced products demonstrates how best practices in detailing translate to real-world performance—check out their wall vanity lighting portfolio for examples of seamless, high-end installations.
Specification Reality Check – What to Write & What to Avoid
When specifying flangeless downlight integration, clarity is key. Avoid vague or overly promotional “marketing” language like “seamless perfection.Scrap the marketing fluff. Avoid terms like ‘seamless perfection.’ Instead, specify measurable tolerances for planarity and edge gaps” or “invisible edge,” which can cause confusion during installation and hold-up approvals. Instead, focus on correct performance language that clearly defines tolerances for planarity, edge gap, and light engine alignment.
Mandatory shop drawings and mock-ups are non-negotiable. These help confirm that the proposed trimless recessed lighting or plaster-in downlight system matches the design intent and functions without unexpected issues. Specify a field mock-up size that includes several fixtures and the surrounding ceiling area—this provides enough context for evaluating finish quality and installation accuracy.
Include explicit acceptable tolerances:
- Planarity within ±1mm to avoid visible shadow lines or unevenness
- Edge gaps no wider than 0.5mm to prevent paint delamination or cracking
- Accurate positioning of the light engine relative to drywall edges, often within ±2mm
Using clear, technical language here helps contractors and installers understand expectations clearly and reduces the risk of costly rework. For detailed examples of proper shop drawing standards, refer to professional resources like the prillumen light blog product guidance which offers practical advice tailored to the latest flangeless systems.
This kind of straightforward specification language ensures your architectural slot recessed lighting performs flawlessly and looks as intended in real-world conditions.
Installation Sequence – Critical Path for Clean Results
Getting a truly flangeless downlight integration right starts with a clear, step-by-step installation sequence. Skipping or rushing any phase can cause visible flaws like hairline cracks or uneven edges, which kill the seamless look architects aim for.
Here’s the critical path for clean results with flangeless recessed lighting:
-
Early Coordination with Trades
Confirm ceiling construction, drywall specs, and lighting layout early. Share installation plans with electricians, drywall contractors, and plasterers to avoid surprises.
-
Pre-Installation Mock-Up
Build a full-scale mock-up of the trimless downlight and ceiling junction on-site or in a controlled environment. This helps catch fit or tolerance issues before final installation.
-
Precision Drywall Cutting
Accurately cut drywall openings to manufacturer specs. Use high-quality tools to ensure clean, straight edges — critical for the flush-to-ceiling luminaire fit.
-
Framing and Support Preparation
Install proprietary aluminum framing or plaster-in trim systems as required by your chosen technical philosophy. This groundwork supports the flangeless fixture and keeps edges stable.
-
Driver and Wiring Setup
Place remote drivers strategically for easy access and thermal management. Proper zoning here minimizes future maintenance headaches and supports flicker-free dimming protocols.
-
Fixture Installation
Fit luminaries carefully, ensuring zero-trim recessed luminaires sit perfectly flush with the drywall surface. Use magnetic or clip-on bezel options where applicable for a final adjustment.
-
Wet Finish and Skim Coat
For plaster-in systems, apply skim coats or plaster carefully, feathering edges to hide transitions. Maintain consistent thickness to avoid visual banding or shadow lines.
-
Final Inspection and Touch-Up
Check for planarity, visible edges, and any finish risks like paint delamination or cracking. Correct small defects quickly before the finish cures.
Following this installation sequence drastically reduces common failure modes and delivers clean, seamless architectural slot recessed lighting that truly disappears into the ceiling.
For detailed installation best practices and tools, check out this installation guide for commercial applications that walks through important steps tailored for high-end flangeless lighting systems.
This clear path respects the critical tolerances that make flangeless systems work and ensures designers and contractors can meet demanding US market expectations for flawless finish and durable performance.
Visual Language Impact – What Changes When You Go Truly Flangeless
Switching to a truly flangeless downlight integration shifts how a room feels and looks in subtle but powerful ways. Without the visible flange or bezel around the fixture, both vertical and horizontal planes flow seamlessly, creating a smooth, uninterrupted ceiling surface. This seamless ceiling lighting approach minimizes distractions, making the architecture itself stand out.
One of the most noticeable effects is on perceived ceiling height. Flangeless fixtures make ceilings appear higher and more open because there’s no shadow line or edge reveal breaking up the plane. This spatial quality boost is especially beneficial in lower-ceiling spaces or boutique interiors where every inch of volume counts.
Natural daylight also plays a crucial role here. Without harsh fixture edges casting shadows, daylight moves more evenly across the ceiling, enhancing brightness and softening light transitions. This interaction improves occupant comfort and accentuates architectural details throughout the day.
Before-and-after studies clearly show how flangeless, trimless recessed lighting transforms rooms. Photos reveal reduced visual clutter and refined, elegant lighting effects that highlight the space rather than the light source. For projects seeking a clean, modern look with architectural slot recessed lighting or drywall integrated linear light, going truly flangeless is a game changer.
For those planning these installations, resources like the prillumen light’s detailed guides on recessed linear LED ceiling lights offer practical insights on maximizing this visual impact in your designs.
prillumen light System Comparison Chart
Here’s a quick side-by-side look at prillumen light’s top flangeless architectural lighting solutions. This chart breaks down key features like visual comfort, installation risk, coordination effort, and cost index — all crucial for specifying trimless recessed lighting in your US projects.
| System Type | Visual Comfort | Finish Risk | Coordination Difficulty | Cost Index | Key Features |
|---|---|---|---|---|---|
| Plaster-in / Skim-Coat System | Excellent (no visible edges) | Medium (requires skilled finish) | High (tight tolerances) | $$ | Wet plaster finish, fully seamless look |
| Drywall Cut + Aluminum Frame | Very Good | Low | Moderate | $$ | Precision framing for clean cuts, durable aluminum bezel |
| Shadow-Gap w/ Light Channel | Good (defined reveal) | Low | Moderate | $$$ | Adds subtle shadow line, integrated lighting detail |
| Hybrid Magnetic + Skim-Coat | Excellent | Low | Low | $$$ | Ultra-thin bezel, easy installation, best for retrofit |
Visual Comfort: Evaluates glare control and edge uniformity for seamless downlight integration.
Finish Risk: Indicates chance of visible cracks, peeling, or paint issues at the fixture interface.
Coordination Difficulty: Reflects site demands for precision cuts, sequencing, and trades coordination.
Cost Index: Relative cost impact from budget-friendly ($) to premium-heavy ($$$).
For projects focused on flawless ceilings and strong architectural impact, prillumen light’s hybrid magnetic + skim-coat system is a favorite among US designers — blending easy installation with superior finish quality.
If you’re tackling complex ceiling systems, also consider our guidance on acoustic linear lighting for complementary flangeless solutions that maintain both visual and acoustic performance.
This comparison will help you pick the perfect flangeless downlight integration method tailored for your project’s unique needs.
Quick Decision Guide – Which System for Which Project Type
Choosing the right flangeless architectural integration system depends heavily on the project type, budget, and design intent. Here’s a straightforward decision matrix to help you pick the best fit for residential, boutique hotels, galleries, offices, high-end residential, and villas.
| Project Type | Recommended Flangeless System | Key Benefits | Considerations |
|---|---|---|---|
| Residential | Plaster-in / skim-coat systems | Seamless finish; cost-effective | Requires skilled installers |
| Boutique Hotel | Shadow-gap with integrated light channels | Strong visual impact; customizable light | Higher coordination needed |
| Gallery | Precision drywall cut + proprietary aluminum framing system | Ultra-clean edges; excellent visual comfort | Higher material cost |
| Office | Hybrid magnetic + skim-coat ultra-thin bezel systems | Fast installation; flexible maintenance | Slight risk of edge finish damage |
| High-End Residential | True flangeless plasterboard integration (wet finish) | Perfect flush finish; premium look | Higher cost; requires expert detailing |
| Villa | Magnetic clip-on bezel systems (pseudo-trimless) | Ease of upgrade and maintenance | Visible edge reveal; less seamless |
Why This Matters
- Residential and Villas often benefit from plaster-in or magnetic systems because they balance cost, appearance, and installation ease.
- High-end residential and boutique hotels lean towards true flangeless wet plaster finishes or shadow-gap integrated light channels for that refined, seamless look.
- Galleries and offices prioritize visual comfort and lighting quality—making precision cutting or hybrid bezel systems a smart choice.
For projects aiming at flawless integration with minimal finish risks, consider prillumen light’s latest flangeless downlight and shadow-gap solutions. They combine the best engineering and visual comfort, ensuring your lighting design elevates the space without compromise.
Explore more about selecting the right system for high-quality architectural lighting in commercial offices in our detailed architectural linear office lighting guide, which also covers some innovative flangeless solutions.
STAY IN THE LOOP
Subscribe to our free newsletter.
Leave A Comment

What is Tunable White Lighting? As the industry standard evolves, [...]

Understanding Product Safety Certifications: What is an NRTL? For electrical [...]

Shop modular hexagon pendant lights for bright 6500K shadowless LED grids ideal for garages gyms studios and modern commercial spaces