
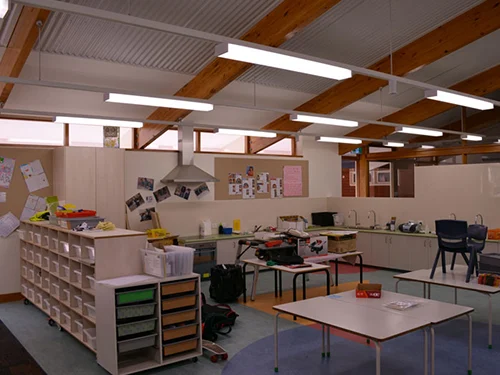
Fluorescent vs. LED Linear Lighting: The Business Case
Upgrading your outdated T8 fluorescent tubes is one of the smartest operational decisions you can make. If you are managing a commercial facility, office building, or retail space, keeping old fluorescent systems running is draining your bottom line. Switching to high-performance LED linear light fixtures drastically cuts overhead costs while immediately modernizing your property.
Energy Efficiency & ROI
When we look at the financial data, the argument for a fluorescent to LED retrofit kit or full fixture replacement is undeniable.
- Power Reduction: Switching from T8 fluorescents to LED linear lighting cuts energy consumption by 50% to 60% instantly.
- Maintenance Costs: Fluorescent ballasts fail frequently and tubes degrade fast. LEDs last up to 50,000 hours or more, eliminating constant maintenance.
- Rapid Payback: With combined energy savings and slashed maintenance hours, most commercial properties reach full ROI (Return on Investment) within 12 to 24 months.
Photometric Performance
LEDs deliver superior directional light distribution. Unlike fluorescent bulbs that scatter light in 360 degrees—wasting lumens inside the fixture housing—LED linear light fixtures direct light exactly where it is needed. This means you get higher usable light levels on tasks and floors with fewer total lumens, optimizing your entire layout.
Visual Comfort and Low UGR Linear Light
Employee productivity and customer comfort depend heavily on light quality. Traditional fluorescents are notorious for harsh glare and invisible flickering that causes eye strain and headaches. Our modern architectural LED linear lighting features advanced diffusers to deliver a low UGR linear light (Unified Glare Rating) system. Keeping the UGR under 19 ensures a comfortable, glare-free working environment that complies with international workplace standards.
Aesthetics: Seamless Continuous Run Architectural Aesthetic
Old T8 fixtures leave dark spots and shadows at the joints when lined up end-to-end. If you want a premium look, upgrading to a continuous run lighting systems path allows for a seamless, unbroken line of light across your ceiling. This creates a clean, high-end architectural aesthetic that elevates the value of any modern commercial space.
| Feature | T8 Fluorescent | LED Linear Light |
|---|---|---|
| Lifespan | 15,000 – 20,000 hours | 50,000+ hours |
| Energy Waste | High (360° emission + heat) | Low (Directional output) |
| Visual Comfort | High glare / Flicker | Low UGR / Flicker-free |
| Design Flexibility | Disconnected rows | Seamless continuous run |
Decoding the LED Upgrade Options: Type A, Type B, Type C, and Full Fixture Replacement
When deciding how to upgrade T8 fluorescent to LED linear light fixtures, you have four distinct paths. We weigh these options constantly based on labor costs, upfront budgets, and long-term performance goals.
| Upgrade Type | System Architecture | Pros | Cons |
|---|---|---|---|
| Type A | Plug-and-Play (Uses existing ballast) | Fastest install, no rewiring | Ballast will fail eventually |
| Type B | Direct Wire (Ballast Bypass) | Eliminates ballast maintenance | Requires fixture rewiring |
| Type C | External Driver System | High efficiency, dimmable | Higher material cost |
| Full Replacement | Integrated commercial linear light replacement | Premium aesthetics, max lifespan | Highest upfront investment |
Type A (Plug-and-Play) Retrofits
This is the simplest approach. You swap the old T8 fluorescent lamp for a compatible LED tube without touching the wiring. The LED runs directly off the existing fluorescent ballast. While it saves on initial labor, you are still at the mercy of an aging ballast that will eventually fail and require replacement.
Type B (Direct Wire / Ballast Bypass) Options
A ballast bypass LED installation involves cutting the ballast out of the circuit entirely and routing the line voltage directly to the sockets. This permanently eliminates ballast maintenance costs and power draw. When selecting Type B direct wire LED tubes, you must navigate two critical technical variables:
- Understanding Single-Ended vs. Double-Ended Wiring: Single-ended tubes require line and neutral wires to connect to a single tombstone at one end of the fixture. Double-ended tubes take line at one end and neutral at the other, making them much easier to wire into existing setups.
- Identifying Shunted vs. Non-Shunted Tombstones: Shunted tombstones have a single path for the electrical current, while non-shunted tombstones keep the two contacts separate. Single-ended LED upgrades strictly require non-shunted tombstones. If your fixture has shunted sockets, you must replace them or opt for a double-ended tube.
Type C (External Driver) Systems
Type C systems utilize an external LED driver mounted inside the fixture casing, replacing the old ballast. Low-voltage DC power runs from the driver to the new LED tubes. This setup delivers excellent efficiency, optimal thermal management, and seamless dimming integration, though it carries a higher price point than Type A or B.
The Complete Fixture Upgrade: Commercial Linear Light Replacement
When old housings are yellowed, cracked, or structurally dated, retrofitting individual lamps loses its value. Investing in a brand-new, integrated architectural LED linear lighting system completely transforms a space. A full fixture replacement delivers superior fluid lines, high efficiency, and advanced control compatibility that old retrofitted troffers simply cannot match.
Step-by-Step Guide: How to Perform a Type B Ballast Bypass LED Installation
Ready to cut the cord on your old, buzzing ballasts? A ballast bypass LED installation (Type B direct wire) is the most reliable way to upgrade. By removing the middleman, you eliminate ballast failure points entirely and slash your long-term maintenance costs. Here is exactly how we get it done safely and efficiently.
Safety First and PPE Protocols
Before touching any wiring, safety is our absolute priority. Never skip these foundational steps:
- Lockout/Tagout (LOTO): Turn off the circuit breaker powering the fixture. Use a lockout device or tag the breaker panel so no one accidentally flips it back on while you are working.
- Verify Zero Voltage: Use a reliable non-contact voltage tester inside the fixture to confirm the power is completely off.
- PPE Essentials: Wear ANSI-approved safety glasses to protect your eyes from falling debris, and use insulated gloves when handling electrical wiring.
Step 1: Removing Old Components
Open the fixture lens or louvers to expose the interior. Gently twist and remove the old T8 fluorescent tubes. Next, remove the ballast cover plate—usually held by clips or a couple of screws—to expose the ballast and the underlying wiring network.
If your current setup relies on older troffers that are rusted or failing structurally, it might be a good time to evaluate a full commercial linear light replacement strategy rather than a simple retrofit.
Step 2: Cutting and Disconnecting the Ballast
Locate the ballast. You will see input wires (usually black and white for line voltage) coming from the building’s power supply, and output wires (red, blue, or yellow) running from the ballast to the light sockets.
Using high-quality wire cutters, cut all wires leading into and out of the ballast as close to the ballast body as possible. You can either remove the disconnected ballast completely to lighten the fixture or leave it screwed in place if it is difficult to detach.
Step 3: Wiring the Sockets (Tombstones)
This is the most critical phase of your Type B direct wire LED tubes setup. Your wiring method depends entirely on whether you are using single-ended or double-ended LED tubes.
+————————————————————————-+
| WIRING METHOD BY LED TUBE TYPE |
+————————————————————————-+
| Single-Ended Tubes | Connect Line (Live) to one pin and Neutral to |
| | the other pin on the SAME tombstone. The opposite |
| | tombstone acts purely as a physical support. |
+———————+—————————————————+
| Double-Ended Tubes | Connect Line to the tombstone(s) at one end of |
| | the fixture, and Neutral to the tombstone(s) at |
| | the opposite end. |
+————————————————————————-+
Crucial Check: When installing single-ended tubes, you must use shunted vs non-shunted tombstones correctly. Single-ended tubes require non-shunted tombstones to prevent a direct electrical short. Double-ended tubes are much more forgiving and typically work with either type.
Use twist-on wire connectors or push-in wire terminals to secure all connections tightly.
Step 4: Labeling and Reassembly
Once your wiring is complete, tuck the wires neatly back into the fixture body and reinstall the ballast cover plate.
Before popping in your new LED tubes, stick the manufacturer-provided modification warning label inside the fixture where it is clearly visible. This label alerts future technicians that the ballast has been bypassed and that the fixture now runs on direct line voltage. ly, install your new T8 LED tubes, replace the fixture lens, and restore power at the breaker panel to test your clean, flicker-free light.
Step-by-Step Guide: Upgrading to Integrated Architectural LED linear lighting
Sometimes, retrofitting old T8 tubes into yellowed, outdated housings just doesn’t cut it. Upgrading to an integrated architectural LED linear lighting system completely transforms your space, delivering a clean, modern aesthetic alongside massive energy savings. When learning how to upgrade T8 fluorescent to LED linear light fixtures, a full fixture swap is the best way to achieve premium visual comfort.
When to Replace the Whole Fixture
We recommend a complete fixture replacement if your current housings have degraded reflectors, cracked tombstones, or if you want to elevate your space with a modern design. Integrated fixtures eliminate the need for replacement lamps and separate ballasts entirely, offering superior thermal management and longer operational lifespans.
Step 1: Structural Assessment & Disconnection
- Power Down: Always shut off the circuit breaker at the main panel and verify the line is dead before touching any wiring.
- Inspect Support Structure: Ensure the existing ceiling grid, drywall, or concrete can handle the weight of the new linear fixtures.
- Remove Old Components: Disconnect the building power lines from the old T8 housing, unbolt the fixture, and carefully remove it from the ceiling.
Step 2: Selecting the Mounting Method
You need to decide how the new hardware will integrate into your space. The two primary options are:
Suspended/Pendant Mount: Ideal for high ceilings, bringing the light source closer to the work plane.
Surface Mount: Perfect for low to medium ceilings where a clean, flush look is required. For a seamless low-profile setup, utilizing a dedicated ceiling mounted linear LED lighting system offers a solid choice that fastens directly to the ceiling structure.
Step 3: Electrical Hookup
Bring the building wire leads (Line, Neutral, and Ground) into the knockouts of the new fixture. Secure the connections using wire nuts or push-in terminal blocks according to the wiring layout. If your project includes smart controls, connect the 0-10V dimming wires (usually purple and pink/gray) to your dimming switch lines at this time.
Step 4: Creating a Continuous Run Lighting Systems Path
To achieve long, uninterrupted lines of light across a commercial interior, individual fixtures must be joined together.
Align Brackets: Insert the alignment pins or joiner keys into the ends of the first fixture.
Mechanical Connection: Slide the second fixture into place, tightening the interior joiner screws to eliminate any light leaks at the seams.
Through-Wiring: Use the factory-installed quick-connect plug harnesses to pass power from one fixture to the next, allowing you to run beautiful continuous run lighting systems from a single electrical feed.
Critical Technical Specs and North American Building Code Compliance
When we help clients upgrade from old T8 fluorescents to modern linear systems, we look closely at safety certifications and building codes. Ensuring your new setup meets strict local and national standards protects your investment and keeps your property compliant.
UL-Listed LED Fixtures and Certifications
We never cut corners on electrical safety. Any hardware you install must carry recognized certifications to pass commercial building inspections and qualify for utility rebates.
- UL/cUL Listed or ETL Certified: This proves the fixture meets stringent US and Canadian safety standards for fire and electrical shock prevention. Learn more about these requirements in our guide on certifications and North American standards.
- DLC Qualified (DesignLights Consortium): Essential for commercial spaces, DLC certification verifies high energy efficiency and is usually required to unlock local utility cash-back rebates.
Thermal Management & Driver Stability
The lifetime of an LED system depends heavily on how it handles heat. Poor thermal design degrades the internal driver, leading to early failure or flickering.
| Technical Component | Key Specification | Why It Matters |
|---|---|---|
| Heat Sink | Aviation-grade aluminum extrusion | Dissipates heat away from chips to maintain brightness. |
| Driver Stability | Class 2 isolated driver (PF > 0.90) | Protects against voltage surges and ensures clean power conversion. |
| Total Harmonic Distortion (THD) | < 15% | Prevents electrical interference on your building’s power grid. |
Environmental Matching: Indoor vs IP66 Wet Location Linear Lights
Matching the fixture construction to your specific environment prevents hazardous short circuits and premature corrosion. We classify installation zones into three primary categories:
- Dry Locations (Indoor Office/Retail): Standard commercial linear light replacement works perfectly here, focusing on sleek aesthetics and optimal visual comfort.
- Damp Locations (Restrooms/Storage): Requires fixtures that handle moisture and condensation without degrading the internal wiring.
- Wet Locations (Parking Garages/Loading Docks): You must use IP66 wet location linear lights. These are completely sealed against dust ingress and powerful water jets, ensuring the system remains completely airtight in harsh conditions.
Elevating Your Space: Beyond the Straight Line
When planning a commercial linear light replacement, you do not have to settle for traditional, rigid rows. Modern architectural LED linear lighting allows us to break free from the standard grid and treat light as a design element that shapes the entire environment.
Geometric Layout Customization
Linear systems are no longer confined to simple straight lines. With advanced X, T, and L-shaped connectors, we can design custom geometric patterns—like continuous squares, zig-zags, or striking recessed webs—that guide foot traffic and define distinct zones within an open floor plan. If you are designing for workspaces, implementing these creative layouts alongside strategic linear LED lighting layout tips for office spaces will drastically improve both the visual branding and utility of the room.
Tunable Lighting Control
The hardware setup is only half the story. Integrating smart, tunable white technology allows you to adjust both brightness and color temperature throughout the day.
- Morning Focus: Crisp, cool white light (4000K–5000K) to boost alertness and productivity.
- Evening Calm: Warm, soft illumination (2700K–3000K) to create a relaxed, welcoming atmosphere.
By pairing a continuous run lighting systems architecture with advanced dimming and tuning controls, we deliver spaces that are highly functional, energy-efficient, and visually captivating.
Frequently Asked Questions (FAQs)
Can you put an LED bulb in a T8 fluorescent fixture?
Yes, you can upgrade T8 fluorescent to LED linear light fixtures using Type A (plug-and-play) tubes that work with existing ballasts, or Type B (ballast bypass) tubes that require rewiring. If you are upgrading larger spaces, switching to dedicated commercial linear light replacement fixtures offers the best longevity and performance.
How do you bypass a ballast for a T8 LED bulb?
To perform a ballast bypass LED installation, you must turn off the main power, cut the hot and neutral wires leading to the ballast, remove or isolate the ballast entirely, and connect the line voltage directly to the tombstones based on whether you are using single-ended or double-ended tubes.
Do I need shunted or non-shunted tombstones for LED lights?
It depends entirely on your wiring method:
| LED Tube Wiring Type | Tombstone Requirement | Action Required |
|---|---|---|
| Single-Ended T8 LED | Non-Shunted Only | Must use separate points for line and neutral. |
| Double-Ended T8 LED | Shunted or Non-Shunted | Fits into existing fluorescent tombstones without changes. |
What is the difference between single-ended and double-ended LED tubes?
- Single-Ended Wiring: Connects both the live and neutral wires to a single tombstone at one end of the fixture. The opposite end only serves as a physical support.
- Double-Ended Wiring: Connects the live wire to one end of the fixture and the neutral wire to the opposite end, making installation faster during a standard Type B direct wire LED tubes retrofit.
Is it cheaper to replace a ballast or switch to LED?
Switching to LED is far more cost-effective in the long run. While a new fluorescent ballast has a low upfront cost, architectural LED linear lighting upgrades cut your energy consumption by up to 60%, eliminate ongoing maintenance, and offer an immediate return on investment.
STAY IN THE LOOP
Subscribe to our free newsletter.
Leave A Comment
Retrofit LED Lighting Solutions Are soaring energy bills, relentless ballast [...]

Struggling to cut operational costs while upgrading your facility’s lighting [...]
The Financial & Operational Business Case Upgrading to energy efficient [...]
Are you worried about overhead head clearance, or tired of [...]